


Kubeadm部署K8S集群并使用containerd做容器运行时
前言
去年12月份,当Kubernetes社区宣布1.20版本之后会逐步弃用<span style=color:orange>dockershim</span>,当时也有很多自媒体在宣传Kubernetes弃用Docker。其实,我觉得这是一种误导,也许仅仅是为了蹭热度。

<span style=color:orange>dockershim</span>是Kubernetes的一个组件,其作用是为了操作Docker。Docker是在2013年面世的,而Kubernetes是在2016年,所以Docker刚开始并没有想到编排,也不会知道会出现Kubernetes这个庞然大物(它要是知道,也不会败的那么快...)。但是Kubernetes在创建的时候就是以Docker作为容器运行时,很多操作逻辑都是针对的Docker,随着社区越来越健壮,为了兼容更多的容器运行时,才将Docker的相关逻辑独立出来组成了<span style=color:orange>dockershim</span>。

正因为这样,只要Kubernetes的任何变动或者Docker的任何变动,都必须维护<span style=color:orange>dockershim</span>,这样才能保证足够的支持,但是通过<span style=color:orange>dockershim</span>操作Docker,其本质还是操作Docker的底层运行时<span style=color:orange>Containerd</span>,而且<span style=color:orange>Containerd</span>自身也是支持<span style=color:orange>CRI</span>(Container Runtime Interface),那为什么还要绕一层Docker呢?是不是可以直接通过 CRI 和<span style=color:orange>Containerd</span>进行交互?这也是社区希望启动<span style=color:orange>dockershim</span>的原因之一吧。
那什么是Containerd呢?
Containerd是一个工业标准的容器运行时,重点是它简洁,健壮,便携,在Linux和window上可以作为一个守护进程运行,它可以管理主机系统上容器的完整的生命周期:镜像传输和存储,容器的执行和监控,低级别的存储和网络。 containerd和docker不同,containerd重点是继承在大规模的系统中,例如kubernetes,而不是面向开发者,让开发者使用,更多的是容器运行时的概念,承载容器运行。
Containerd是从Docker中分离的一个项目,旨在为Kubernetes提供容器运行时,负责管理镜像和容器的生命周期。不过Containerd是可以抛开Docker独立工作的。它的特性如下:
- 支持OCI镜像规范,也就是runc
- 支持OCI运行时规范
- 支持镜像的pull
- 支持容器网络管理
- 存储支持多租户
- 支持容器运行时和容器的生命周期管理
- 支持管理网络名称空间
1 Containerd 架构图

2 Containerd 作用
- 管理容器的生命周期(从创建容器到销毁容器)
- 拉取/推送容器镜像
- 存储管理(管理镜像及容器数据的存储)
- 调用 runC 运行容器(与 runC 等容器运行时交互)
- 管理容器网络接口及网络
3 为什么需要 Containerd
- 继续从整体 docker 引擎中分离出的项目(开源项目的思路)
- 可以被 Kubernets CRI 等项目使用(通用化)
- 为广泛的行业合作打下基础(就像 runC 一样)
4 Containerd 的技术方向
- 简洁的基于 gRPC 的 API 和 client library
- 完整的 OCI 支持(runtime 和 image spec)
- 同时具备稳定性和高性能的定义良好的容器核心功能
- 一个解耦的系统(让 image、filesystem、runtime 解耦合),实现插件式的扩展和重用。
下图展示了Containerd的技术架构
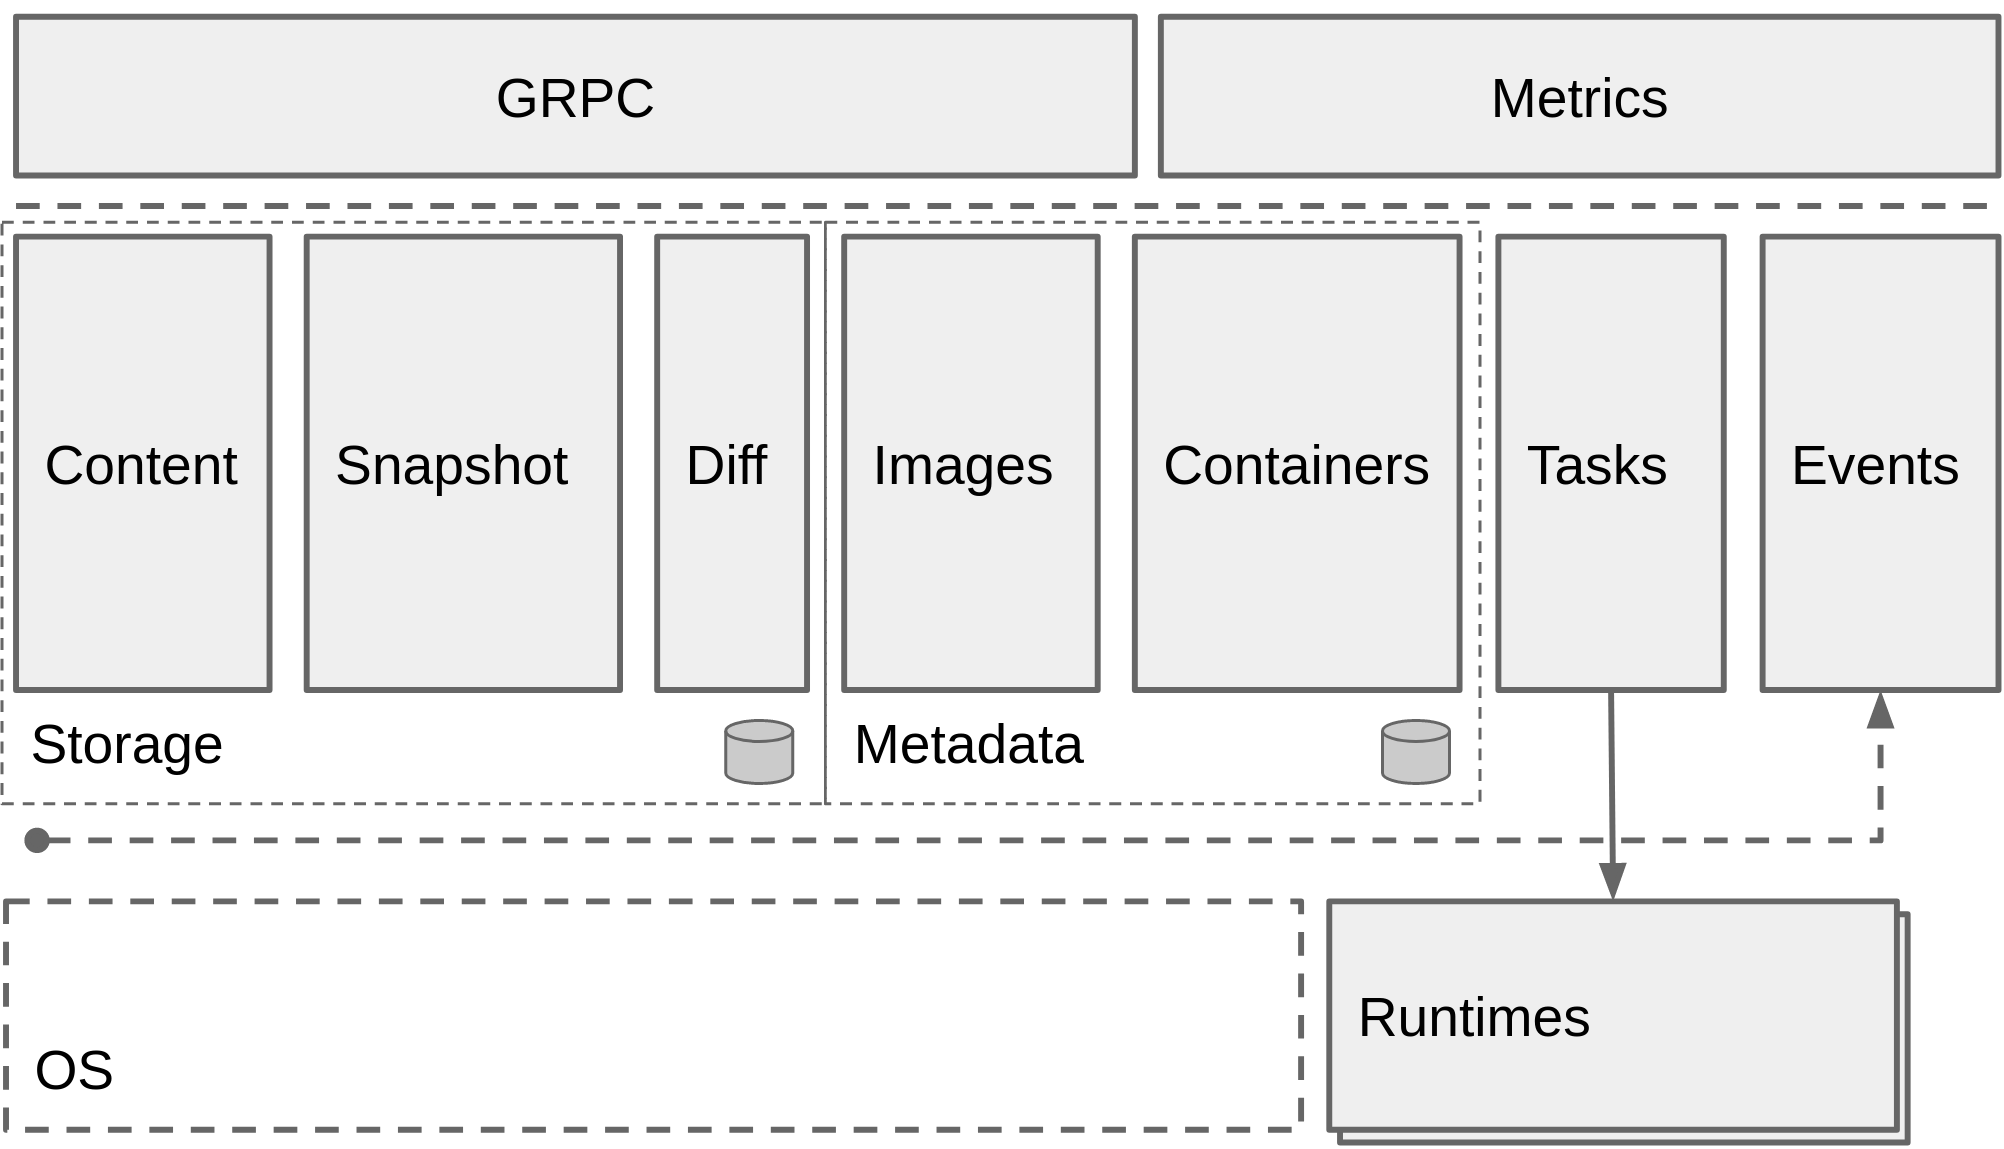
在架构设计和实现方面,核心开发人员在他们的博客里提到了通过反思 graphdriver 的实现,他们将 containerd 设计成了 snapshotter 的模式,这也使得 containerd 对于 overlay 文件系、snapshot 文件系统的支持比较好。 storage、metadata 和 runtime 的三大块划分非常清晰,通过抽象出 events 的设计,containerd 也得以将网络层面的复杂度交给了上层处理,仅提供 network namespace 相关的一些接口添加和配置 API。这样做的好处无疑是巨大的,保留最小功能集合的纯粹和高效,而将更多的复杂性及灵活性交给了插件及上层系统。
5 Containerd 的愿景目标

当 containerd 和 runC 成为标准化容器服务的基石后,上层的应用就可以直接建立在 containerd 和 runC 之上。上图中展示的容器平台都已经支持 containerd 和 runC 的组合了,相信接下来会有更多类似的容器平台出现。 注意: Containerd 被设计成嵌入到一个更大的系统中,而不是直接由开发人员或终端用户使用。所以 containerd 具有宏大的愿景
Containerd和Docker的区别
Containerd和Docker在命令使用上的一些区别主要如下:
| 功能 | Docker | Containerd |
|---|---|---|
| 显示本地镜像列表 | docker images | crictl images |
| 下载镜像 | docker pull | crictl pull |
| 上传镜像 | docke push | 无 |
| 删除本地镜像 | docker rmi | crictl rmi |
| 查看镜像详情 | docker inspect | crictl inspecti |
| 容器相关功能 | docker | containerd |
|---|---|---|
| 显示容器列表 | docker ps | crictl ps |
| 创建容器 | docker create | crtctl create |
| 启动容器 | docker start | crtctl start |
| 停止容器 | docker stop | crictl stop |
| 删除容器 | docker rm | crictl rm |
| 查看容器详情 | docker inspect | crictl inspect |
| attach | docker attach | crictl attach |
| exec | docker exec | crictl exec |
| logs | docker logs | crictl logs |
| stats | docker stats | crictl stats |
| POD相关功能 | docker | containerd |
|---|---|---|
| 显示POD列表 | 无 | crictl pods |
| 查看POD详情 | 无 | crictl inspectp |
| 运行POD | 无 | crictl runp |
| 停止POD | 无 | crictl stopp |
可以看到使用方式大同小异。 下面介绍一下使用kubeadm安装K8S集群,并使用containerd作为容器运行时的具体安装步骤。
环境说明
主机节点
| IP地址 | 系统 | 内核 |
|---|---|---|
| 202.205.161.91 | CentOS7.9 | 3.10 |
| 202.205.161.92 | CentOS7.9 | 3.10 |
| 202.205.161.93 | CentOS7.9 | 3.10 |
| 202.205.161.94 | CentOS7.9 | 3.10 |
| 202.205.161.95 | CentOS7.9 | 3.10 |
| 202.205.161.96 | CentOS7.9 | 3.10 |
| 202.205.161.97 | CentOS7.9 | 3.10 |
| 202.205.161.98 | CentOS7.9 | 3.10 |
软件说明
| 软件 | 版本 |
|---|---|
| kubernetes | 1.22.4 |
| containerd | 1.4.12 |
环境准备
系统级基础配置
1.在每个节点上添加 hosts 信息:
cat /etc/hosts
----------------
202.205.161.91	Master1
202.205.161.92	Master2
202.205.161.93	Node03
202.205.161.94	Node04
202.205.161.95	Node05
202.205.161.96	Node06
202.205.161.97	Node07
202.205.161.98	Node08
202.205.161.99	Node09
2.禁用防火墙:
systemctl stop firewalld && systemctl disable firewalld
3. 禁用SELINUX:
# 将 SELinux 设置为 permissive 模式(相当于将其禁用)
sudo setenforce 0
sudo sed -i 's/^SELINUX=enforcing$/SELINUX=permissive/' /etc/selinux/config
getenforce
4. 创建/etc/sysctl.d/k8s.conf文件,添加如下内容:
vim /etc/sysctl.d/k8s.conf
---------------------------
net.bridge.bridge-nf-call-ip6tables = 1
net.bridge.bridge-nf-call-iptables = 1
net.ipv4.ip_forward = 1
5. 执行如下命令使修改生效:
$ modprobe br_netfilter
$ sysctl -p /etc/sysctl.d/k8s.conf
6. 安装 ipvs
cat > /etc/sysconfig/modules/ipvs.modules <<EOF
#!/bin/bash
modprobe -- ip_vs
modprobe -- ip_vs_rr
modprobe -- ip_vs_wrr
modprobe -- ip_vs_sh
modprobe -- nf_conntrack_ipv4
EOF

chmod 755 /etc/sysconfig/modules/ipvs.modules && \
bash /etc/sysconfig/modules/ipvs.modules && \
lsmod | grep -e ip_vs -e nf_conntrack_ipv4

上面脚本创建了的/etc/sysconfig/modules/ipvs.modules文件,保证在节点重启后能自动加载所需模块。使用lsmod | grep -e ip_vs -e nf_conntrack_ipv4命令查看是否已经正确加载所需的内核模块。
7. 安装 ipset 软件包:
yum install ipset -y && yum install ipvsadm -y
#为了便于查看 ipvs 的代理规则,最好安装一下管理工具 ipvsadm
8. 同步服务器时间
yum install chrony -y && systemctl enable chronyd && systemctl start chronyd && chronyc sources
9. 关闭 swap 分区:
swapoff -a
10. 修改/etc/fstab文件
注释掉 SWAP 的自动挂载,使用free -m确认 swap 已经关闭。swappiness 参数调整,修改`/etc/sysctl.d/k8s.conf`添加下面一行:
vim /etc/sysctl.d/k8s.conf
--------------------------
vm.swappiness=0
执行sysctl -p /etc/sysctl.d/k8s.conf使修改生效。
注意,此时可能会报错,需要先执行modprobe br_netfilter然后再运行上面命令即可。
运行时安装
11. 接下来可以安装 Containerd
先决条件:
cat <<EOF | sudo tee /etc/modules-load.d/containerd.conf
overlay
br_netfilter
EOF

sudo modprobe overlay
sudo modprobe br_netfilter

# 设置必需的 sysctl 参数,这些参数在重新启动后仍然存在。
cat <<EOF | sudo tee /etc/sysctl.d/99-kubernetes-cri.conf
net.bridge.bridge-nf-call-iptables  = 1
net.ipv4.ip_forward                 = 1
net.bridge.bridge-nf-call-ip6tables = 1
EOF

# 应用 sysctl 参数而无需重新启动
sudo sysctl --system
yum install -y yum-utils \
device-mapper-persistent-data \
lvm2

yum-config-manager \
--add-repo \
https://download.docker.com/linux/centos/docker-ce.repo

yum list | grep containerd
# 可以选择安装一个版本,比如我们这里安装最新版本:
sudo dnf install containerd.io.x86_64 -y

此处安装时 CentOS8应该会报错,是由于centos8默认使用podman代替docker。需要先卸载相应软件后再安装。
#	1. 查看是否安装 Podman
rpm -q podman
podman-1.4.2-5.module_el8.1.0+237+63e26edc.x86_64
#	2. 删除Podman
dnf remove podman
# 	3.删除其它软件
yum erase podman buildah
12. 创建containerd配置文件:
mkdir -p /etc/containerd
containerd config default | sudo tee /etc/containerd/config.toml

# 替换配置文件
sed -i "s#k8s.gcr.io/pause:3.2#winjay/pause-amd64:3.5#g" /etc/containerd/config.toml
sed -i '/containerd.runtimes.runc.options/a\ \ \ \ \ \ \ \ \ \ \ \ SystemdCgroup = true' /etc/containerd/config.toml
sed -i "s#https://registry-1.docker.io#https://ptgaj77b.mirror.aliyuncs.com#g"  /etc/containerd/config.toml

13. 启动Containerd
systemctl daemon-reload && systemctl enable containerd && systemctl restart containerd
14.如若使用Docker做为容器运行时时
-
在每个节点上,根据安装 Docker 引擎 为你的 Linux 发行版安装 Docker。 你可以在此文件中找到最新的经过验证的 Docker 版本 依赖关系。
-
配置 Docker 守护程序,尤其是使用 systemd 来管理容器的 cgroup。
sudo mkdir /etc/docker

cat <<EOF | sudo tee /etc/docker/daemon.json
{
  "exec-opts": ["native.cgroupdriver=systemd"],
  "log-driver": "json-file",
  "log-opts": {
    "max-size": "100m"
  },
  "storage-driver": "overlay2"
}
EOF
Kubernetes安装及配置
在确保 Containerd安装完成后,上面的相关环境配置也完成了,现在我们就可以来安装 Kubeadm 了,我们这里是通过指定yum 源的方式来进行安装,使用阿里云的源进行安装:
cat <<EOF > /etc/yum.repos.d/kubernetes.repo
[kubernetes]
name=Kubernetes
baseurl=http://mirrors.aliyun.com/kubernetes/yum/repos/kubernetes-el7-x86_64
enabled=1
gpgcheck=0
repo_gpgcheck=0
gpgkey=http://mirrors.aliyun.com/kubernetes/yum/doc/yum-key.gpg  http://mirrors.aliyun.com/kubernetes/yum/doc/rpm-package-key.gpg
EOF


# 将 SELinux 设置为 permissive 模式(相当于将其禁用)
sudo setenforce 0
sudo sed -i 's/^SELINUX=enforcing$/SELINUX=permissive/' /etc/selinux/config
安装kubeadm、kubelet、kubectl(我安装的是最新版,有版本要求自己设定版本):
# 设置运行时:
crictl config runtime-endpoint /run/containerd/containerd.sock

# 安装kubernetes工具
yum install -y kubelet kubeadm kubectl --disableexcludes=kubernetes

# 加入开机启动项
systemctl daemon-reload systemctl enable kubelet && systemctl start kubelet
systemctl enable --now kubelet
到这里为止上面所有的操作都需要在所有节点执行配置。
初始化集群
初始化Master
然后接下来在 master 节点配置 kubeadm 初始化文件,可以通过如下命令导出默认的初始化配置:
kubeadm config print init-defaults > kubeadm.yaml
然后根据我们自己的需求修改配置,比如修改 imageRepository 的值,kube-proxy 的模式为 ipvs,需要注意的是由于我们使用的containerd作为运行时,所以在初始化节点的时候需要指定cgroupDriver为systemd【1】
apiVersion: kubeadm.k8s.io/v1beta2
bootstrapTokens:
- groups:
  - system:bootstrappers:kubeadm:default-node-token
  token: abcdef.0123456789abcdef
  ttl: 24h0m0s
  usages:
  - signing
  - authentication
kind: InitConfiguration
localAPIEndpoint:
  advertiseAddress: 192.168.0.5
  bindPort: 6443
nodeRegistration:
  criSocket: /run/containerd/containerd.sock
  name: k8s-master
  taints:
  - effect: NoSchedule
    key: node-role.kubernetes.io/master
---
apiServer:
  timeoutForControlPlane: 4m0s
apiVersion: kubeadm.k8s.io/v1beta2
certificatesDir: /etc/kubernetes/pki
clusterName: kubernetes
controllerManager: {}
dns:
  type: CoreDNS
etcd:
  local:
    dataDir: /var/lib/etcd
imageRepository: registry.cn-hangzhou.aliyuncs.com/google_containers
kind: ClusterConfiguration
kubernetesVersion: v1.20.5
networking:
  dnsDomain: cluster.local
  podSubnet: 172.16.0.0/16
  serviceSubnet: 10.96.0.0/12
scheduler: {}
---
apiVersion: kubeproxy.config.k8s.io/v1alpha1
kind: KubeProxyConfiguration
mode: ipvs
---
apiVersion: kubelet.config.k8s.io/v1beta1
kind: KubeletConfiguration
cgroupDriver: systemd


=======20211201========
apiVersion: kubeadm.k8s.io/v1beta3
bootstrapTokens:
- groups:
  - system:bootstrappers:kubeadm:default-node-token
  token: abcdef.0123456789abcdef
  ttl: 24h0m0s
  usages:
  - signing
  - authentication
kind: InitConfiguration
localAPIEndpoint:
  advertiseAddress: 202.205.161.92
  bindPort: 6443
nodeRegistration:
  criSocket: /run/containerd/containerd.sock
  imagePullPolicy: IfNotPresent
  name: Master02
  taints: null
---
apiServer:
  timeoutForControlPlane: 4m0s
apiVersion: kubeadm.k8s.io/v1beta3
certificatesDir: /etc/kubernetes/pki
clusterName: kubernetes
controllerManager: {}
dns: {}
etcd:
  local:
    dataDir: /var/lib/etcd
imageRepository: registry.cn-hangzhou.aliyuncs.com/google_containers
kind: ClusterConfiguration
kubernetesVersion: 1.22.0
networking:
  dnsDomain: cluster.local
  podSubnet: 10.244.0.0/16
  serviceSubnet: 10.96.0.0/12
scheduler: {}
---
apiVersion: kubeproxy.config.k8s.io/v1alpha1
kind: KubeProxyConfiguration
mode: ipvs
---
apiVersion: kubelet.config.k8s.io/v1beta1
kind: KubeletConfiguration
cgroupDriver: systemd
然后使用上面的配置文件进行初始化:
kubeadm init --config=kubeadm.yaml
【
 注意:CPU核心必须大于1
   必须关闭Swap区(临时,永久)
】

[init] Using Kubernetes version: v1.20.5
[preflight] Running pre-flight checks
[preflight] Pulling images required for setting up a Kubernetes cluster
[preflight] This might take a minute or two, depending on the speed of your internet connection
[preflight] You can also perform this action in beforehand using 'kubeadm config images pull'
[certs] Using certificateDir folder "/etc/kubernetes/pki"
[certs] Generating "ca" certificate and key
[certs] Generating "apiserver" certificate and key
[certs] apiserver serving cert is signed for DNS names [k8s-master kubernetes kubernetes.default kubernetes.default.svc kubernetes.default.svc.cluster.local] and IPs [10.96.0.1 192.168.0.5]
[certs] Generating "apiserver-kubelet-client" certificate and key
[certs] Generating "front-proxy-ca" certificate and key
[certs] Generating "front-proxy-client" certificate and key
[certs] Generating "etcd/ca" certificate and key
[certs] Generating "etcd/server" certificate and key
[certs] etcd/server serving cert is signed for DNS names [k8s-master localhost] and IPs [192.168.0.5 127.0.0.1 ::1]
[certs] Generating "etcd/peer" certificate and key
[certs] etcd/peer serving cert is signed for DNS names [k8s-master localhost] and IPs [192.168.0.5 127.0.0.1 ::1]
[certs] Generating "etcd/healthcheck-client" certificate and key
[certs] Generating "apiserver-etcd-client" certificate and key
[certs] Generating "sa" key and public key
[kubeconfig] Using kubeconfig folder "/etc/kubernetes"
[kubeconfig] Writing "admin.conf" kubeconfig file
[kubeconfig] Writing "kubelet.conf" kubeconfig file
[kubeconfig] Writing "controller-manager.conf" kubeconfig file
[kubeconfig] Writing "scheduler.conf" kubeconfig file
[kubelet-start] Writing kubelet environment file with flags to file "/var/lib/kubelet/kubeadm-flags.env"
[kubelet-start] Writing kubelet configuration to file "/var/lib/kubelet/config.yaml"
[kubelet-start] Starting the kubelet
[control-plane] Using manifest folder "/etc/kubernetes/manifests"
[control-plane] Creating static Pod manifest for "kube-apiserver"
[control-plane] Creating static Pod manifest for "kube-controller-manager"
[control-plane] Creating static Pod manifest for "kube-scheduler"
[etcd] Creating static Pod manifest for local etcd in "/etc/kubernetes/manifests"
[wait-control-plane] Waiting for the kubelet to boot up the control plane as static Pods from directory "/etc/kubernetes/manifests". This can take up to 4m0s
[kubelet-check] Initial timeout of 40s passed.


[apiclient] All control plane components are healthy after 70.001862 seconds
[upload-config] Storing the configuration used in ConfigMap "kubeadm-config" in the "kube-system" Namespace
[kubelet] Creating a ConfigMap "kubelet-config-1.20" in namespace kube-system with the configuration for the kubelets in the cluster
[upload-certs] Skipping phase. Please see --upload-certs
[mark-control-plane] Marking the node k8s-master as control-plane by adding the labels "node-role.kubernetes.io/master=''" and "node-role.kubernetes.io/control-plane='' (deprecated)"
[mark-control-plane] Marking the node k8s-master as control-plane by adding the taints [node-role.kubernetes.io/master:NoSchedule]
[bootstrap-token] Using token: abcdef.0123456789abcdef
[bootstrap-token] Configuring bootstrap tokens, cluster-info ConfigMap, RBAC Roles
[bootstrap-token] configured RBAC rules to allow Node Bootstrap tokens to get nodes
[bootstrap-token] configured RBAC rules to allow Node Bootstrap tokens to post CSRs in order for nodes to get long term certificate credentials
[bootstrap-token] configured RBAC rules to allow the csrapprover controller automatically approve CSRs from a Node Bootstrap Token
[bootstrap-token] configured RBAC rules to allow certificate rotation for all node client certificates in the cluster
[bootstrap-token] Creating the "cluster-info" ConfigMap in the "kube-public" namespace
[kubelet-finalize] Updating "/etc/kubernetes/kubelet.conf" to point to a rotatable kubelet client certificate and key
[addons] Applied essential addon: CoreDNS
[addons] Applied essential addon: kube-proxy

Your Kubernetes control-plane has initialized successfully!

To start using your cluster, you need to run the following as a regular user:

  mkdir -p $HOME/.kube
  sudo cp -i /etc/kubernetes/admin.conf $HOME/.kube/config
  sudo chown $(id -u):$(id -g) $HOME/.kube/config

Alternatively, if you are the root user, you can run:

  export KUBECONFIG=/etc/kubernetes/admin.conf

You should now deploy a pod network to the cluster.
Run "kubectl apply -f [podnetwork].yaml" with one of the options listed at:
  https://kubernetes.io/docs/concepts/cluster-administration/addons/

Then you can join any number of worker nodes by running the following on each as root:

kubeadm join 192.168.0.5:6443 --token abcdef.0123456789abcdef \
    --discovery-token-ca-cert-hash sha256:446623b965cdb0289c687e74af53f9e9c2063e854a42ee36be9aa249d3f0ccec


=======20211201========
[root@Master02 ~]# kubeadm init --config=kubeadm.yaml
[init] Using Kubernetes version: v1.22.0
[preflight] Running pre-flight checks
	[WARNING Hostname]: hostname "master02" could not be reached
	[WARNING Hostname]: hostname "master02": lookup master02 on 202.205.160.3:53: no such host
[preflight] Pulling images required for setting up a Kubernetes cluster
[preflight] This might take a minute or two, depending on the speed of your internet connection
[preflight] You can also perform this action in beforehand using 'kubeadm config images pull'
[certs] Using certificateDir folder "/etc/kubernetes/pki"
[certs] Generating "ca" certificate and key
[certs] Generating "apiserver" certificate and key
[certs] apiserver serving cert is signed for DNS names [kubernetes kubernetes.default kubernetes.default.svc kubernetes.default.svc.cluster.local master02] and IPs [10.96.0.1 202.205.161.92]
[certs] Generating "apiserver-kubelet-client" certificate and key
[certs] Generating "front-proxy-ca" certificate and key
[certs] Generating "front-proxy-client" certificate and key
[certs] Generating "etcd/ca" certificate and key
[certs] Generating "etcd/server" certificate and key
[certs] etcd/server serving cert is signed for DNS names [localhost master02] and IPs [202.205.161.92 127.0.0.1 ::1]
[certs] Generating "etcd/peer" certificate and key
[certs] etcd/peer serving cert is signed for DNS names [localhost master02] and IPs [202.205.161.92 127.0.0.1 ::1]
[certs] Generating "etcd/healthcheck-client" certificate and key
[certs] Generating "apiserver-etcd-client" certificate and key
[certs] Generating "sa" key and public key
[kubeconfig] Using kubeconfig folder "/etc/kubernetes"
[kubeconfig] Writing "admin.conf" kubeconfig file
[kubeconfig] Writing "kubelet.conf" kubeconfig file
[kubeconfig] Writing "controller-manager.conf" kubeconfig file
[kubeconfig] Writing "scheduler.conf" kubeconfig file
[kubelet-start] Writing kubelet environment file with flags to file "/var/lib/kubelet/kubeadm-flags.env"
[kubelet-start] Writing kubelet configuration to file "/var/lib/kubelet/config.yaml"
[kubelet-start] Starting the kubelet
[control-plane] Using manifest folder "/etc/kubernetes/manifests"
[control-plane] Creating static Pod manifest for "kube-apiserver"
[control-plane] Creating static Pod manifest for "kube-controller-manager"
[control-plane] Creating static Pod manifest for "kube-scheduler"
[etcd] Creating static Pod manifest for local etcd in "/etc/kubernetes/manifests"
[wait-control-plane] Waiting for the kubelet to boot up the control plane as static Pods from directory "/etc/kubernetes/manifests". This can take up to 4m0s
[apiclient] All control plane components are healthy after 30.005530 seconds
[upload-config] Storing the configuration used in ConfigMap "kubeadm-config" in the "kube-system" Namespace
[kubelet] Creating a ConfigMap "kubelet-config-1.22" in namespace kube-system with the configuration for the kubelets in the cluster
[upload-certs] Skipping phase. Please see --upload-certs
[mark-control-plane] Marking the node master02 as control-plane by adding the labels: [node-role.kubernetes.io/master(deprecated) node-role.kubernetes.io/control-plane node.kubernetes.io/exclude-from-external-load-balancers]
[mark-control-plane] Marking the node master02 as control-plane by adding the taints [node-role.kubernetes.io/master:NoSchedule]
[bootstrap-token] Using token: abcdef.0123456789abcdef
[bootstrap-token] Configuring bootstrap tokens, cluster-info ConfigMap, RBAC Roles
[bootstrap-token] configured RBAC rules to allow Node Bootstrap tokens to get nodes
[bootstrap-token] configured RBAC rules to allow Node Bootstrap tokens to post CSRs in order for nodes to get long term certificate credentials
[bootstrap-token] configured RBAC rules to allow the csrapprover controller automatically approve CSRs from a Node Bootstrap Token
[bootstrap-token] configured RBAC rules to allow certificate rotation for all node client certificates in the cluster
[bootstrap-token] Creating the "cluster-info" ConfigMap in the "kube-public" namespace
[kubelet-finalize] Updating "/etc/kubernetes/kubelet.conf" to point to a rotatable kubelet client certificate and key
[addons] Applied essential addon: CoreDNS
[addons] Applied essential addon: kube-proxy

Your Kubernetes control-plane has initialized successfully!

To start using your cluster, you need to run the following as a regular user:

  mkdir -p $HOME/.kube
  sudo cp -i /etc/kubernetes/admin.conf $HOME/.kube/config
  sudo chown $(id -u):$(id -g) $HOME/.kube/config

Alternatively, if you are the root user, you can run:

  export KUBECONFIG=/etc/kubernetes/admin.conf

You should now deploy a pod network to the cluster.
Run "kubectl apply -f [podnetwork].yaml" with one of the options listed at:
  https://kubernetes.io/docs/concepts/cluster-administration/addons/

Then you can join any number of worker nodes by running the following on each as root:

kubeadm join 202.205.161.92:6443 --token abcdef.0123456789abcdef \
	--discovery-token-ca-cert-hash sha256:5b1ef71acdb68ab82da9f79acb264f0518ada5c615213a7f8e251cc11ed11c18


部署CNI网络
到此为止,所有的Master及Node节点都是未就绪状态,需要部署CNI网络插件才可正常就绪;使用Calico网络进行部署。
wget https://docs.projectcalico.org/manifests/calico.yaml
kubectl apply -f calico.yaml
部署MetricsServer
https://github.com/kubernetes-sigs/metrics-server
--kubelet-preferred-address-types=InternalIP 	  #以node ip连接kubelet
--kubelet-insecure-tls  						#跳过tls检查
--secure-port=4443
--cert-dir=/tmp


kubectl apply -f components.yaml

Work节点加入集群
kubeadm join 202.205.161.92:6443 --token abcdef.0123456789abcdef --discovery-token-ca-cert-hash sha256:5b1ef71acdb68ab82da9f79acb264f0518ada5c615213a7f8e251cc11ed11c18


3.1.6 - 利用 kubeadm 创建高可用集群
kubeadm init --config kubeadm.yaml --control-plane-endpoint "202.205.161.88:6443" --upload-certs
彻底卸载K8S集群
yum remove -y kubelet kubeadm kubectl
kubeadm reset -fmodprobe -r ipiplsmodrm -rf ~/.kube/
rm -rf /etc/kubernetes/
rm -rf /etc/systemd/system/kubelet.service.d
rm -rf /etc/systemd/system/kubelet.service
rm -rf /usr/bin/kube*
rm -rf /etc/cni \
rm -rf /opt/cni \
rm -rf /var/lib/etcd \
rm -rf /var/etcd
# 卸载docker
yum remove containerd.io.x86_64 docker-ce.x86_64 docker-ce-cli.x86_64 docker-ce-rootless-extras.x86_64 docker-scan-plugin.x86_64rm -rf /sys/fs/cgroup/cpuset/docker /sys/fs/cgroup/net_cls,net_prio/docker /sys/fs/cgroup/pids/docker /sys/fs/cgroup/blkio/docker /sys/fs/cgroup/memory/docker /sys/fs/cgroup/devices/docker /sys/fs/cgroup/freezer/docker /sys/fs/cgroup/perf_event/docker /sys/fs/cgroup/hugetlb/docker /sys/fs/cgroup/cpu,cpuacct/docker /sys/fs/cgroup/systemd/docker /etc/docker /var/lib/docker /var/lib/docker /usr/libexec/docker

# 检测是否删除成功
yum list installed | grep dockerdocker version
/sys/fs/cgroup/cpuset/docker /sys/fs/cgroup/net_cls,net_prio/docker /sys/fs/cgroup/pids/docker /sys/fs/cgroup/blkio/docker /sys/fs/cgroup/memory/docker /sys/fs/cgroup/devices/docker /sys/fs/cgroup/freezer/docker /sys/fs/cgroup/perf_event/docker /sys/fs/cgroup/hugetlb/docker /sys/fs/cgroup/cpu,cpuacct/docker /sys/fs/cgroup/systemd/docker /etc/docker /var/lib/docker /var/lib/docker /usr/libexec/docker


评论区